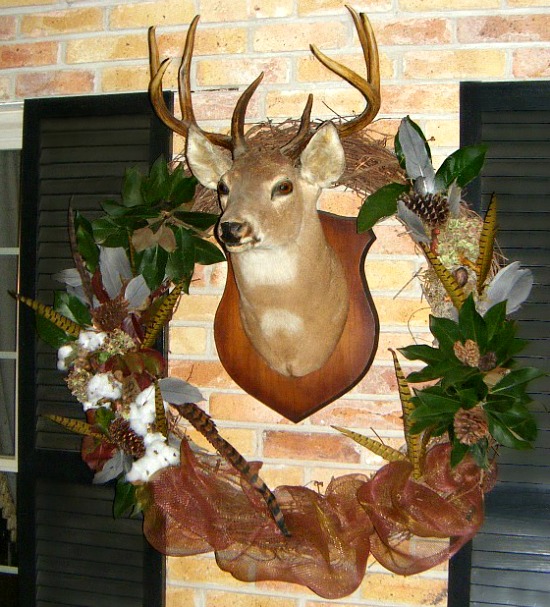
A Thanksgiving wreath is a lovely way to show the beauty of the season, and besides, the holidays are not the holidays until I tackle a DIY project.

Thanksgiving Wreath Materials List:
wreath
hot glue gun
glue sticks
floral wire
wire cutters
Spanish moss
floral Moss
faux gourds & pumpkins
acrylic paint
foam paint brush
assorted leaves
cotton stalks
dried Hydrangea blooms
pine cones, pecans, & acorns
deco floral mesh
feathers

Here’s what you do:
Step 1
Begin with a wreath of the material, shape, and size of your choice.
I like using grapevine wreaths for the look, durability, and ease of reuse.
The initial $17.99 investment pays for itself over and over.
I don’t glue items directly to the wreath for that reason.
Cover work surface with newspaper for easy post wreath project clean up.

Step 2
Select the materials you will be using and the area(s) of the wreath you will be adorning.
With Thanksgiving as the theme, I like using natural elements such as cotton stalks, dried hydrangea blooms, Bartlett pear, sweetgum, and magnolia leaves, goose and pheasant feathers, pecans, acorns, and pine cones for the wreath.

Spanish and floral moss, mini gourds and pumpkins, and goose and pheasant feathers left over from the fall tablescape also figured into the material mix.

Step 3 (optional)
If the bright colors of the mini gourds and pumpkins don’t fit with the color palette, a foam paint brush and acrylic paint in a color that will can solve the issue.
I marked up the pumpkin with a gold paint pen and allowed it to dry.
To tone down the bright orange and yellow colors of the gourds and pumpkins, tip the foam paint brush lightly in the acrylic paint in raw umber, applying in sponge technique.
Acrylic paint dries quick, and from experience I can report it is very easy to clean off fingers, fingernails, and surfaces- just so you know.

Step 4
Select items and work in terms of groupings for better decorative control.
Cut hydrangea flowers and cotton stalks stems about 8 inches, allowing enough room to work with.
Make the stems long enough to work with at first.
My final cut for the stems measures about 3-4 inches long.
Insert the stems between grapevines.


Step 5
Using a hot glue gun and being careful not to burn yourself (gosh that hurts, doesn’t it?), apply hot glue to the back of the painted gourds and pumpkins.
Press them down applying pressure and hold into place for a few seconds.
Add a couple of drops of hot glue to the lower part of the back of the sweet gum leaves, applying to the cotton bloom to secure.
Fill in any blank areas with Spanish and floral moss.
The Spanish moss stays beautifully in place between the vines.


Step 6
Pine cones, acorns, and pecans come next.
Apply a generous squeeze of hot glue to the back of a pine cone, press it into place while applying pressure.
Hold in place for a few seconds to allow it to adhere.
Repeat the same for the acorns and pecans.

Step 7
As with the dried hydrangea blooms, cotton stalks, and Bartlett pears leaves- cut the magnolia leaf stem down to about a 3-4 inch stem.
Insert the magnolia stem directly between vines.

Step 8
Using 21 inch wide floral mesh, figure the length of the area of the wreath you want to cover with the floral mesh, allowing extra mesh for the poufs.
Using wire cutters, cut a piece of floral wire about 5 inches long.
Starting about 3-4 inches from the end of the mesh, gather the mesh together in the middle and twist tie with wire. This makes the mesh easier to insert between grapevine.
Insert between vines and pull the end back up slightly, securing the starting point.
Step 9
To make mesh poufs, work around the area of the wreath you want to cover by gathering sections of mesh together in the middle, poufing it out, and tucking between vines. The vines hold the mesh securely without wire.
Use wire cutters, cut a piece of floral wire about 5 inches long.
Starting about 3-4 inches from the end of the mesh, gather the mesh together in the middle and twist tie with wire.
Insert between the vines and pull the end back up slightly, securing the ending point.
Step 10
Insert pheasant and goose feathers by simply tucking each quill between vines.
Material Cost:
36″ Grapevine Wreath from Hobby Lobby: $17.99
Cotton stalks, dried hydrangea blooms, Bartlett pear, sweet gum, and magnolia leaves, goose and pheasant feathers, pecans, acorns, and pine cones: free
Mini gourds: $1
Mini pumpkins: $1
Spanish moss: $1
Floral moss: $1
Wire cutters: $1
Americana Acrylic Paint: $1.09
Foam paint brush: .20¢
Floral wire: $1
Deco floral mesh : $4.99
Thanksgiving Wreath Total Cost: $30.27 + tax